
Tagged: WWII
Freyburg Takes Command on Crete

On 27 April 1941, the German army raised the Nazi flag over the Acropolis in Athens and the last Allied troops were evacuated to Crete from the Peloponnese. Crete was the obvious next target. The loss of Crete would isolate Turkey, seal the flank of the upcoming German invasion of the Soviet Union, put permanent Luftwaffe bomber airfields in range of Egypt, prevent the British from easily supporting the already troublesome Greek and Jugoslav partisans, and most importantly, keep British bombers from targeting Hitler’s only dependable supply of natural oil, the Ploesti oil fields in Romania. The three big, and new or expanded airfields on the north coast of the island were the keys to Crete. On 30 April 1941, MajGen Bernard Freyberg was given command of Crete with the explicit task of keeping the airfields out of German hands.
Freyberg was a larger than life and barrel chested man, personal friend of Winston Churchill, and the senior operational officer from New Zealand. He earned the Victoria Cross in the First World War, and was fearlessly aggressive: he was wounded 27 times though he did tell Churchill once that it was only half that as “you usually get two wounds each time – one coming in and one going out”. As the 2nd Zealand Division commander, he inherited “Creforce” with more than 40,000 soldiers. He had three of his Kiwi brigades, one large Australian brigade group, the British brigade sized garrison, three Greek brigades, and a surprisingly effective composite Greek brigade consisting of Greek officer cadets, NCO and basic trainees, their cadres, and the Cretan gendarme. A formidable force to repel any German invasion, on paper at least.
Unfortunately, 15,000 were noncombatant soldiers from which he could only form a single under strength composite brigade. The rest were “mouths to feed” and “useless, except for causing problems with the civilians”. Crete had a food shortage that the extensive vineyards, and olive and orange groves were no help mitigating. Furthermore he had woefully inadequate artillery and AA, only 24 working tanks, few trucks, and only 15 fighter aircraft. Moreover, the exiled Greek Royal family was on the island, and made the local political situation delicate. But most troubling were the few operational radios, and a supply and communication’s system based on runners and vulnerable wire along the single coast road. However, what he lacked in essential resources, it was thought was made up with numbers, a generous to a fault, warlike, and zealously anti-German population, and near perfect intelligence.
The morning Freyberg assumed command, he met with RAF Group Captain George Beamish, ostensibly to discuss the appalling air defenses of the island. But Beamish had a more important additional duty: he was the only officer on the island allowed to decode and view the “Orange Leonard” communiques, the Ultra intercepts of high level Luftwaffe operations orders. Through Beamish and Ultra, Freyberg knew the German objectives (the airfields, particularly Maleme), the German units involved (7th FJ Div, and 22nd Airlanding Div), the invasion method (airborne with supporting seaborne landing), the German commander (Luftwaffe Gen Kurt Student, the Father of the Fallshirmjaeger), the supporting air groups, their airfields, and finally the invasion date – 16 May.
Later that evening, Winston Churchill cabled his support to his friend and said the upcoming battle was, “a fine opportunity for killing parachute troops”.
The Battle for the Corinth Canal

TBy late April, 1941, the British, Commonwealth and Greek forces were in full retreat to the Peloponnesian peninsula where the British navy was already evacuating thousands of troops to Crete off the east coast. In order to reach the Peloponnese, the evacuating troops had to cross over the narrow Isthmus of Corinth which was cut by a canal that linked the Gulf of Corinth and the Aegean Sea.
At dawn on 26 April 1941, the 2nd Fallschirmjaeger (parachute) Regiment landed on both sides of the canal to seize the bridges in order to cut off the withdrawal and open up an avenue for the pursuing panzers to cross the canal. The parachute landings surprised the defending Australian battalion, but by the time the Germans managed to get organized and find their weapons (Fallshirmjaeger parachuted unarmed and gathered their weapons from canisters parachuted separately), the Australian infantry and British Matilda tanks were already counterattacking. However, German Stuka dive bombers broke up the attacks, and within the hour there was hand to hand fighting on both sides of the highway bridge and foot bridge.
About 0800, the bridge exploded. There are two theories: 1. The Australians detonated the charges (the simple and most likely theory) and 2. The German paratroops seized the bridge, cleared the explosives, cut the wires, and a rogue shell fired by a Kiwi artillery piece eight miles away set the explosives off (an account given by a German officer who would have suffered severe repercussions for allowing the bridge to be destroyed. Needless to say this account is most favored by German historians and airborne enthusiasts).
You, intelligent reader, judge for yourself.
In any case the bridge was destroyed, and the 2nd FJ took extensive casualties. The 1st SS Leibstandarte Division was delayed crossing the canal, which allowed another 22,000 Allioed troops to evacuate from Nafplio. The cut off British rearguard, the 4th New Zealand Bde retreated to Megara, near Athens, and was evacuated with great difficulty by the British navy the next day.
The Rats of Tobruk
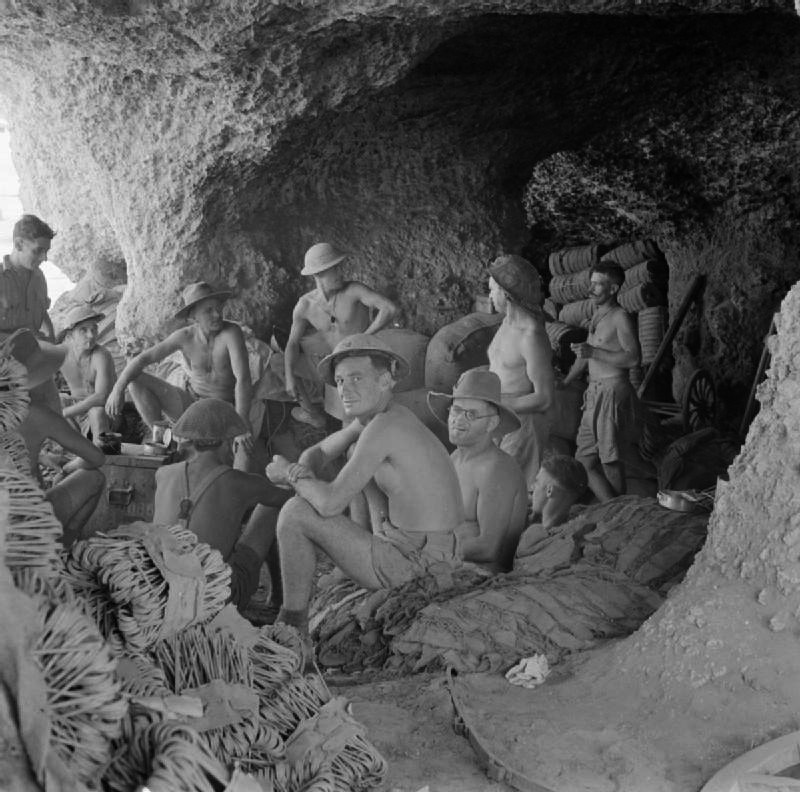
From 10 April to 30 April 1941, Lieutenant General Leslie Morshead’s 9th Australian Division defeated every attempt by Rommel’s Afrika Korps to seize the vital city and port of Tobruk on Libya’s northeast coast. On 1 May, Rommel invested the city with five Italian divisions and continued on to Egypt before the British could regroup. The British Navy provided enough supplies for the the garrison to hold out indefinitely, despite much hard fighting when the Italians made a deliberate assault. The Australians’ aggressive nighttime patrolling and numerous spoiling attacks kept the Italian’s attacks to a minimum. Furthermore, they launched raids on Afrika Korps supply lines from the city which caused great frustration to Rommel’s precarious logistics situation. Morshead held out until the end of August when his Australians were replaced by Poles, Czechs, and Brits brought in by the British Navy.
The Battle of Sfax

The British naval victories at Taranto and Cape Matapan allowed Adm. Cunningham to anchor the 14th Destroyer Squadron in Valletta Harbor on Malta to raid Axis shipping heading to Libya. The first fruits of that opportunity came on the night of 15-16 April, 1941 just off the coast of Sfax, Tunisia.
Three days before, four troopships carrying the remainder of the 15th Panzer Division (less vehicles), and one ammunition ship carrying three basic loads, departed Naples escorted by three Italian destroyers. The British, informed by ULTRA intercepts, tracked the convoy by seaplane until it was in the shallow waters off Tunisia, where it couldn’t disperse if attacked.
On the evening of 15 April, the four destroyers of the squadron: HMS Jervis, HMS Nubian, HMS Mohawk, and HMS Janus, exploited the Italian’s lack of radar and snuck to within 2000m of the convoy. Just before 2 am, the British destroyers ambushed the convoy and immediately sank or damaged all three destroyers with torpedoes or 4.7″ guns. They then turned their guns on the defenseless and cornered transports and sank all five. Only the heroic efforts of an Italian ensign, the surviving officer aboard the destroyer Luca Tarigo, prevented a one sided victory. The young 20 year old officer rallied what remained of the crew, and attacked the British flotilla as they were systematically destroying the transports. He managed to put two torpedoes into HMS Mohawk, whom had to be abandoned and scuttled.
Greece is Doomed

On 8 April 1941, the German 6th Mountain Division cracked the Metaxas Line in the most unlikely of places: the extremely mountainous far west of the line, after scaling the twin heights of Demir Kapou and Kale Bair. Both mountains were over 7000 ft (twice the height of Riva Ridge) and thought by the Greeks to be insurmountable. Nonetheless, the feat was almost in vain as just west, the 2nd Panzer Division blew through Yugoslavia and raced near unopposed toward Thessalonica. To the northwest, the advanced guard of the 1st SS Leibstandarte Adolf Hitler Brigade, Hitler’s elite bodyguard, entered the northern end of the Monastir Pass, whose southern exit outflanked Gen Maitland Wilson’s Force W along the Halciamon Line.
Wilson knew of the German advances in near real time due to Ultra intelligence intercepts but couldn’t convince the Greeks to retreat. He couldn’t compromise the nature of his information, and in any case the Greeks were experiencing great success on the eastern end of the Metaxas Line, and were unwilling to disengage from a “winning” battle. Wilson dispatched an Australian brigade group to the southern end of the Monastir Gap, but even by force marching they barely made it there in time. Wilson essentially sacrificed them to save the rest of Force W. Wilson was only able to stay ahead of the Germans due to his Ultra intelligence. Force W, and any Greeks nearby, retreated first to the Mt Olympus Line, and then to the Thermopylae Line further south. But both would be outflanked, and two more brigades, Kiwis these times, would be sacrificed to slow down the advance so the rest of Force W could evacuate to Crete.
The Iraqi Coup d’état

Even the brilliant victory off Cape Matapan couldn’t salvage Great Britain’s foreign policy in Balkans, Mid East, and Eastern Mediterranean. The Greek government was in chaos after the unexpected death of Ioannis Metaxas. Prince Paul of Yugoslavia was the personal guest of Adolf Hitler at the Eagle’s Nest and signed Tripartite Pact. German troops were openly preparing for the Invasion of Greece, and Gen Archibald Wavell, the CinC MidEast was already making plans to evacuate the British expeditionary force there. And even worse, Turkey, watching the complete rout of O’Conner’s troops in Libya (O’Conner was captured by Rommel on 4 April) was leaning dangerously towards siding with Germany, as they had 25 years before. Turkey was no longer “The Sick Man of Europe” and its large and professional army would spell disaster for the British in the Middle East. And unlike the First World War, there would be no “Arab uprising” by new Lawrences of Arabia. As it was, the British could barely contain the pro German and pro Italian sympathies of many Arabs, particularly in Iraq.
In 1932, the Kingdom of Iraq was granted independence but as part of the treaty Britain retained some petroleum, passage, and basing rights. However as 80% of the British Empire’s oil came from Iraq, Persia (Iran), and Kuwait, British diplomats continued to meddle in Iraqi affairs. On 1 April 1941, Rashid Ali, a former pro German prime minister, led a coup with the four top Iraqi army and air force generals aka “The Golden Square”, against the pro-British monarchy. The Prince Regent fled to the RAF airbase at Habbaniyah, halfway between the towns of Ramadi and Fallujah. Over the next few days, Rashid Ali had all pro-British supporters arrested and formed the National Defense Government. Wavell could nothing to stop the coup: he had but a single battalion in Mandate Palestine, and a reinforced battalion defending RAF Habbaniyah. All four divisions of the Royal Iraqi Army sided with Rashid.
Turkey was now surrounded on all sides by pro German countries: National Defense Iraq, a nominally pro German but neutral Persia, the Soviet Union, Bulgaria, and Vichy French Syria. Only Greece and the small British expeditionary force there remained as a symbol of Allied power in the area.
The Battle of Cape Matapan

In late March 1941, the British had the better part of three divisions in Greece and Crete, and supplying them required a steady stream of convoys from Egypt. Italian intelligence accessed that the British had just one battleship and no carriers in the Eastern Mediterranean, so Mussolini launched the pride of the Italian Navy, the ultra-modern battleship Vittorio Veneto (it was less than a year old), eight cruisers, and seventeen destroyers to raid convoys bound for Greece.
Italian intelligence was sorely mistaken. Admiral Cunnigham, the CinC of the British Mediterranean Fleet was reinforced by the ships that cleared the Gulf of Aden and the Red Sea of Axis ships in February. He had three battleships, an aircraft carrier, seven cruisers, and seventeen destroyers, centered around his flagship, the First World War veteran HMS Warspite. Nevertheless, the Italian ships were faster, stronger, more heavily armed, and more modern. However, British intelligence could read the Italian enigma transmissions and knew exactly when the first raid would take place. Cunningham needed to get the Italians close, before the Vittorio Veneto’s higher speed, longer range and better fire control smashed the older British battlewagons.
Using a destroyer squadron as bait, Cunningham ambushed the Italians in the dark seas off of the tip of southern Greece’s Cape Matapan on 28 March 1941. All day Cunningham played a game of cat and mouse with the Italians with his destroyers and Swordfish torpedo planes. With the Italians suitably disorganized by dusk, and the VV slowed by multiple torpedo hits, Cunningham closed in for the kill that night. During the night fighting at point blank range the Italians’ more modern ships mattered little. Fearing the loss of the pride of Fascist Italy, the Italians broke off the fight before the heavily damaged Vittorio Veneto was sunk. The Italians lost three cruisers, three destroyers and nearly 2400 sailors. The British lost three sailors killed and two near obsolete torpedo bombers shot down.
For the rest of the war, the Mediterranean Sea was a British lake, especially with Malta still in Allied hands. Only with great difficulty and massive German air support could Rommel be supplied in North Africa.
Rommel Attacks

By the third week of March, 1941, LtGen Richard O’Connor’s Western Desert Force had just two understrength divisions, the 9th Australian Infantry Division and the British 2nd Armoured Division (half of whose tanks were Italian). Churchill had withdrawn four divisions and sent them to reinforce Greece for the inevitable German attack. Gen Wavell, the British CinC Middle East, reluctantly agreed because he thought that the German forces arriving in Libya would be in no condition to attack before May. By then, he would have the tanks and planes in the “Tiger” Convoy which would completely refit the British 7th Armored Division (pulled back to Egypt), reinforce the RAF and infantry divisions, and modernize the ad hoc Polish and Free French units under his command.
But the commander of the German Afrika Korps, GeneralLeutnant Erwin Rommel didn’t wait for the entire corps to arrive. He formed the 5th Light “Afrika” Division around the newly arrived 5th Panzer Regiment and its supporting units and reorganized four Italian Divisions, the Bresca and Pavia Inf Divisions, the Trieste Motorized Div, and the Arieta Armoured Division. At 0600 24 March 1941 the fast eight wheeled Panzerspahwagens (armored cars) of the 5th Light raided the rear areas of the 2nd Armoured Division to open the offensive. Later that morning Rommel Attacks! (hehe) with all five divisions and seized El Alghelia that night.
The stunned British retreated to Benghazi and Rommel dogged them the entire way. He captured Ajedabia on 2 April, and audaciously split the Afrika Korps into three columns to out flank the British and Commonwealth forces (which ironically was exactly what O’Connor did two months before during Operation Compass, just from the east). One column continued up the coast road to Benghazi, one across the Cyrenaican plateau to Derna, and another across the base of the Cyrenaican Hump to Tobruk. When Rommel arrived outside Tobruk on 11 April, the British had barely escaped the trap, and then only by retreating along the coast road as fast as possible, ditching or destroying much needed supplies and equipment along the way.
Rommel wrote his wife,
“Dearest Lu,
We’ve been attacking since the 31st with dazzling success. I took the rise against all orders and instructions because the opportunity seemed favorable. The British are falling over each other to get away. Our casualties are small and our booty can’t be estimated. You have to understand: I can’t sleep for happiness…”
The Great Escape
By 1944, thousands of Allied airmen had been shot down and captured by the Germans. But even in captivity, it was the duty of every officer to attempt to escape in order to tie down German resources to guard the prisoners. By late 1942, troublesome prisoners with multiple escape attempts were sent to Stalag Luft III (Air Prison 3) which was deemed “escape proof” by the Lufwaffe.
But what the Germans really did was place every escape artist on continental Europe in the same camp. Led by British Squadron Leader Roger Bushnell, the camp formed an escape committee that spearheaded an effort to breakout hundreds of prisoners in a single night.
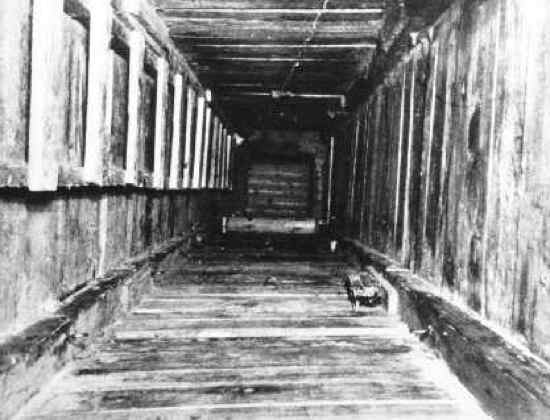
The planning and preparation effort for such an endeavor was huge and would take over a year. Every prisoner had to be given a disguise, travel documents, a fake ID, maps, compass, and enough survival gear to get them to a friendly or neutral country. All the while avoiding German and other occupying authorities. All of which had to be manufactured in secret under the noses of the camp guards. The biggest problem however was getting out of the camp. To effect this, four tunnels were dug, code named “Tom”, “Dick”, “Harry” and “George”. Preparations for the mass breakout continued throughout 1943 and into 1944.
By winter in early 1944, three of the tunnels had been abandoned and all efforts put into “Harry”. On the moonless night of 24 Mar 1944, 200 prisoners of Stalag Luft III were waiting their turn to travel through the 104m long tunnel from the camp to the woods beyond. But the tunnel wasn’t long enough and when the first escapee broke through the earth, he found he was 3m short of the wood line and very near the route of a German roving guard. A signal system was set up to avoid the guard but the throughput of Harry was seriously diminished. Not all 200 would make it out that night. The decision was made to go ahead anyway.
76 prisoners escaped that night in the largest breakout in World War 2. The Great Escape caused chaos across occupied Europe as tens of thousands of German and Axis troops attempted to track down the fugitives. 73 of the 76 were eventually recaptured. Hitler was so incensed by the breakout that he personally ordered the first 50 killed by the Gestapo. The other 23 were returned to the camp alive. Only three would actually make it to safety. One made it to neutral Spain via the French Resistance and two stowed away on a ship bound for neutral Sweden.
The Battle of the Atlantic: Seesaw

At no point during World War Two were the fluctuating fortunes of both the Allies and the Axis in the Battle of the Atlantic so fully on display as the first two weeks of March 1941.
-26 February: Battlecruisers Scharnhorst and Gneisenau broke out into the Atlantic. They sink 22 ships around the Azores and Cape Verde Islands and returned on 14 Mar.
-1 March German pocket battleship Admiral Sheer broke out into South Atlantic, sinks six ships, returned on 27 March.
-2 March: U Boat wolfpack savaged fast Convoy HX-109. Convoy was found due to German expertise in radio signal direction finding which each U-boat was equipped. In all, 83 ships were sunk by U boats over these three weeks, an above average total.
-4 March: Operation Claymore. The first large scale commando raid of the war. Commandos raided the fish oil and glycerin factories of the Norwegian Loften Islands. Wildly successful, but even more so because the commandos captured four rotors of a German enigma machine which would allow the British to decode German naval signals traffic.
-6 March: In a reaction to estimates from the Home Office that Great Britain had just five months of essential supplies left, even with severe rationing, Winston Churchill issued guidance that the Battle of the Atlantic was the top priority of the British and Commonwealth armed forces.
-7 March: Germany’s #3 U boat captain and hero of the raid on Scapa Flow, Gunther Prien, was killed when his U boat was sunk in an attack on convoy OB-293.
-7 March: 12 German E- boats (PT boats) nearly destroyed convoys FN-426 and FS-429 off the English coast.
-11 March: the German cruiser Admiral Hipper sank 14 of 19 freighters in convoy HG-43 off the African coast near Sierra Leone.
-11 March: Lend-Lease.
-12 March: RAF bombers severely damaged the FW-220 factories near Bremen, and due to bureaucratic infighting they never recovered. The FW-220 “Condor” was Germany’s only four engine bomber. Allied convoys feared the big long range converted passenger plane because a sighting of one inevitably meant one or two sunk ships from bombs, and a wolfpack attack within 24 hours.
14 March: German auxiliary cruiser Atlantis sank or captured four ships in the south Atlantic. In all, the Atlantis and her sister ships, the most famous of whom were the Komoran and Pinguin, sank or captured 14 ships in these two weeks.
16 March: the German’s #1 and #2 U boat captains, Otto Ketchmer and Jochim Scepke were both killed separate wolfpack attacks in the North Atlantic. Scepke’s U-100 was the first U-boat lost while tracked by radar.
-16 March: German battleship Bismarck and cruiser Prinz Eugen began sea trials in the Baltic.

You must be logged in to post a comment.