Operation Crusader Prelude: The British Eighth Army

After the failure of Operation Battleaxe to relieve Tobruk and the sound thrashing the British received from the Vichy French in Syria in June 1941, the CinC Middle East Archibald Wavell was replaced by Gen Claude Auchinleck (They essentially switched jobs). Unlike Wavell, the no nonsense Auchinleck was not intimidated by Churchill’s constant demands for action, specifically to attack Rommel. Auchinleck’s first action as CinC MidEast was to fly to London and explain to Churchill the realities on the ground. To defeat Rommel, he needed two, preferably three armoured divisions, control of the air, enough training time for arriving troops, and enough supplies to push across Cyrenaica and into Libya without culminating. Furthermore, he needed enough troops to secure the Caucasus’ passes against German penetrations from the north in Russia. (It seems silly in hindsight, but it was a very real concern in the summer and autumn of 1941). Auchinleck expertly and calmly laid out his case, and Churchill reluctantly agreed on a November offensive. Auchinleck later told his staff, Churchill “couldn’t browbeat facts”.

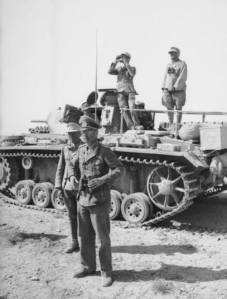
In August and September, Auchinleck reorganized his command into two armies, the Ninth Army in Syria, Palestine and Iraq, and the Eighth Army in Egypt. He successfully courted American officials to ensure that he wouldn’t be forgotten in the scramble for Lend Lease supplies. When those supplies began arriving in bulk in September, Auchinleck, behind an elaborate deception operation and secure in the knowledge that Rommel wouldn’t attack before he took Tobruk, he pulled his mobile units out of the line for refit and rearming (That’s why the Afrika Korps found nothing during the recce/raid of Mersa Matruh in late September). The British tankers loved the mechanical reliability and speed of the US Stuart light tanks (if not the gas mileage and tiny gun), dubbing them “Honeys”. However, they needed more. What the Americans couldn’t provide, Home Defense would have to and Churchill delivered.

Churchill wasn’t happy, but he recognized that an invasion of the Home Islands was unlikely while Hitler was fighting in the Soviet Union. Rommel had to be defeated before Russia fell and the Wehrmacht turned its attention back to Great Britain. To the howling protests of the Home Guard and the Imperial General Staff, Churchill sent a sizable portion of the all-important RAF Fighter Command in England to North Africa, and more importantly, virtually the entire mobile reserve of Great Britain, the 1st UK Armoured Division, whose primary task up til then was to counterattack any German landings in England.

On 9 November, 1941, the division’s long trip around Africa finally ended when the last convoy from Great Britain containing the Valentine and Matilda tanks of the 1st UK Tank Brigade passed through the Suez Canal and arrived in Port Said, Egypt. By 16 November, the entire Eighth Army was in its assault positions for the long awaited operation to relieve Tobruk and push Rommel out of Africa:

Operation Crusader.

Operation Crusader Prelude: Rommel and Tobruk

On 8 November, 1941, the British cruisers HMS Aurora and HMS Penelope slipped out of Valetta Harbor in Malta with two destroyers and savaged an Italian fuel and ammunition convoy enroute to Rommel in Africa. Despite a heavy Italian escort of 2 cruisers and 7 destroyers, the British escaped unscathed: the use of radar and Ultra intelligence meant the Royal Navy was in position and firing before the Italians could react. All five freighters were sunk.

For Rommel, logistics was by far his biggest problem. 1 in 4 merchantmen sailing from Sicily or Naples to Libya sat at the bottom of the Mediterranean. Rommel did not seize Malta, the base from which the convoy attacks originated, because he used the supplies allocated for the invasion of Malta for his last offensive under the misguided impression that the British were about to withdrawal from Egypt. And after the disastrous, if successful, airborne landings on Crete, Hitler forbade any more such airborne operations, so he was more than willing to approve Rommel’s misuse of the invasion’s supplies, an invasion the Italians knew needed to happen. Moreover, any supplies that made the Mediterranean crossing had a 600 km drive from Libya to the front during which the trucks carrying much needed fuel for his panzers consumed 70% of what they carried just to get there. Along the way, the convoys were subject to RAF raids, Long Range Desert Group ambushes, and Australian, and increasingly Polish, fighting patrols from the porous siege of Tobruk. If he couldn’t seize Malta, then he needed to grab Tobruk.

Tobruk had been under siege since April 1941, and the Australian garrison, and their Polish and British replacements, had no inclination of giving up the vital Libyan port. Rommel couldn’t advance further into Egypt with the 20,000 man garrison behind him: his logistics lifeline, the coast road Via Bardia, ran near the town, and every truck that passed by was subject to Allied attack. Rommel devised a plan to seize the port with his Afrika Corps in mid November. He just needed to be sure the Allies wouldn’t attack him before it was captured.

On 25 September 1941, the Afrika Korps of Gen Erwin Rommel’s PanzerArmee Afrika launched reconnaissance in force around the British defenses toward Mersa Matruh, Egypt. Their objectives were threefold: 1. Identify Allied dispositions. 2. Destroy or capture British armor in assembly areas identified by Luftwaffe reconnaissance aircraft and Italian spies. And 3. Capture as much fuel, equipment and provisions as possible for resource starved German and Italian troops at the far end of a 300 mile supply line across North Africa.

The division sized recce/raid encountered not a single Allied tank. They id’d defensive belts, but zero offensive capability. Rommel assumed the Allies were still not capable of launching an offensive, and decided to go ahead with his plan to seize Tobruk. The best units of his in Africa: the 15th Panzer Division, 90th Light Div, and the capable Italian Ariete and Trieste Armoured Divisions, were pulled from the front line in Egypt to prepare to assault Tobruk in mid-November.

Rommel was mistaken.

Operation Attleboro

By September 1966, there were 385,000 US troops in Vietnam and the most recently arrived were the 4500 of the 196th Light Infantry Brigade from Ft Devens, Massachusetts. By mid-October, their base camps were built in the operationally important Tay Ninh Province, the gateway to Saigon from the Cambodian border. On 25 September 1966, the arctic trained Brigade began Operation Attleboro, a series of battalion search and destroy missions into the sparsely populated countryside, as more of a training exercise to confirm standard operating procedures and familiarize themselves with air mobile operations in Vietnam.

Surprisingly, Operation Attleboro was initially spectacularly successful beyond the wildest fever dreams of its commander. The sweeps just south of the expansive Michelin Rubber Plantation had little contact and uncovered massive supply caches: one cache located by the “Polar Bears” of 4-31 IN had 843 tons of rice, enough to feed thousands of VC for months. The Americans had inadvertently stumbled on the prepositioned supplies of the entire 9th VC Division and the elite 101st Brigade of the North Vietnamese Army.

Both communist units were just across the border in Cambodia in a base area known to the Americans as the “Fishhook”, where they were conducting their final training and preparation for their assault on the newly arrived 196th. Gen Giap in Hanoi had personally selected the 196th for destruction in order to inflame the burgeoning US anti-war movement. And instead of having to assault their base camps, the brigade had come into the open. As the 196th painstakingly cleared the caches and redistributed the rice, the Communists moved to assault positions.

Among the mounds of weapons, ammunition, and medical supplies, the 196th found documents detailing another large logistics complex (the NVA brigade’s prepositioned supplies) along the Suoi Bao stream off the Saigon River, about 6 km away. The 196th’s commander, feeling pretty cocky, developed an overly complicated plan to assault the area from all four directions, with none of his battalions in mutual support. Despite protests from the battalion commanders, who were all infantrymen, that command and control would be impossible in the dense terrain, the brigade commander, an artilleryman in World War II, ordered the operation forward assuming the same level of opposition as before. He could not have been more wrong.

On 3 November 1966, the brigade air assaulted into widely scattered landing zones around the logistics complex and were immediately swarmed upon by the entire 9th VC Division and its supporting North Vietnamese regulars. For three days (about as long as a human can stay awake and coherently fight), 4000 Americans and 9000 Communists locked horns in a small 14 square km area of jungle and swamp, where as predicted, command and control broke down at the tactical level. Both sides fought each other to exhaustion. Every American company had at least 40% casualties and when they trudged to their landing zones for extraction on 6 November, the men of the 196th assumed they had gotten their asses kicked. They were also wrong.

The Vietnamese had gotten as good as they gave, but what they hadn’t counted on was the ability of the Americans to mass forces quickly. At the ardent behest of the nearby 1st Infantry Division’s commander, MG William DePuy, the Americans air assaulted nearby battalions in to continue the fight. For the next three weeks, a new brigade from either the 1st ID or 4th ID, and the 173rd were inserted into Tay Ninh Provice to continue the destruction of the Communist units. At first Giap tried to do the same by marching in from Cambodia, but soon realized he was just feeding good men into a battle he could not win against superior American mobility and firepower. The 9th VC Division and its NVA attachment were destroyed, the logistics areas cleared, and the Tay Ninh Province quiet for the next year in America’s first corps level operation of the Vietnam War.

But Giap took advantage of the quiet area and forbade future contact there, if possible. As American units moved on to other “hot” areas, such as “The Iron Triangle” further south, Giap’s Central Office of South Vietnam (COSVN), the primary Communist headquarters outside of Hanoi, established itself just across the Cambodian border in the Fishhook. COSVN used the “pacified” but now nearly unpopulated Tay Ninh province as a transit point to infiltrate men, supplies and equipment from the Ho Chi Minh Trail to VC and NVA units in the south. The province was simply too large and too sparsely populated for the South Vietnamese CIDG battalions to control or even know what was going on in the area. Americans would occasionally sweep the area (Operation Junction City in 1967) but never stayed. Most of the supplies used in the south during the Tet Offensive 14 mos later came thru Tay Ninh. This would continue until Nixon’s invasion of Cambodia in 1970, whose primary objective was the Fishhook.

Crisis in the Pacific

Japan’s war with China, in particular the “Three All’s Policy” (Kill All, Loot All, Burn All) officially known in Japan as the “Burn to Ash Strategy”, and Japan’s occupation of French Indochina led to America’s scrap metal and oil embargo of Japan in July of 1941. Japan relied on America for 90% of its tin, steel and oil. Emperor Hirohito directed negotiators to find a compromise with the US by 1 November or he would order the Japanese military to make preparations to seize the oil fields, rubber plantations, and tin mines of the Dutch East Indies. Before this could be done, Malaya, a British possession had to be cleared, as did the Philippines, a US Commonwealth. In order to protect these offensives from counterattack by the US Pacific Fleet, Adm Yamamoto envisioned a surprise attack on its anchorage at Pearl Harbor.

On 1 Nov, the Japanese Embassy in Washington DC reported no progress in the negotiations, and Hirohito gave his approval for preparations for war with the Netherlands, Great Britain and America, with the caveat that if a breakthrough at the table was made, the preparation would be called off. Aware that the Americans and British were tracking their carriers via radio transmissions, the Japanese immediately implemented a long prepared “deception and denial” plan that included a massive increase in fake radio transmissions. It threw the US Navy intelligence sections across the Pacific into chaos. That day, CMDR Joseph Rochefort, lead cryptanalyst of the US Navy’s Hawaii station, reported that the Japanese changed the call signs of every ship in their fleet, and his section was trying to sort everything out. That afternoon, the US Pacific Fleet went on the first of many alerts over the next month. The next day the Japanese increased the encryption of Rochefort’s “baby”, the Japanese “Flag Officer’s Code”, in addition to the Main Fleet Cipher JN-25. At the morning briefing the unorthodox but brilliant Rochefort had the unenvious job of telling Admiral Kimmel that he had “lost” four Japanese aircraft carriers. (He had actually lost six: he had mistakenly placed two in the Marshall Islands. All six were enroute to the Kurile Islands for a “fleet exercise”, actually to conduct rehearsals and prepare for the attack on Pearl Harbor, but they wouldn’t know that for another two weeks.)

In response, Kimmel ordered another alert. Additionally, he assumed the Philippines would most likely be a target of any initial Japanese attack (He was not wrong, just not right, ask an intelligence officer to explain the difference), so he also ordered the formation of the Pacific Escort Force to convoy merchantmen and freighters from Pearl Harbor to the Far East, as his brethren were doing in the Atlantic. That evening, the last non-convoyed ship reached its destination when Wake Island was reinforced by a detachment from the 1st Marine Defense Battalion led by Major James Devereux, bringing the garrison of the tiny atoll to just under 400 men.

The USS Reuben James

On October 31st, 1941, the USS Reuben James was escorting an eastbound convoy from Halifax, Nova Scotia and was sunk by a torpedo from a German Type IX U Boat U-552 off the coast of Iceland. Although the German declaration of war and the Japanese attack on Pearl Harbor were still more than a month away, she was the first American ship sunk by enemy fire during World War II. The Reuben James was part of the “Undeclared War” fought against the German Navy while protecting convoys supplying Lend Lease material to Great Britain in 1941.

The Battle of White Plains

Unlike Lower Manhattan, where the Continental Army scattered at the sight of the British Navy’s guns, LTG George Washington skillfully parried the Howe brothers’ landing attempts to the north of Harlem Heights for two weeks in October 1776. But with complete command of the sea, it was only a matter of time before the British found an uncovered beach. They did so on the night of 18 October on a narrow spit of land known as Throgg’s Neck.

The landing at Throgg’s Neck rendered the fortifications at Harlem Heights untenable, but was far enough away to allow Washington time enough to organize an escape. He didn’t completely abandon Manhattan as he left 2000 men under BG Nathaniel Greene at Fort Washington which blocked access of the river to the British Navy and allowed supplies to cross. He planned for Fort Washington to withstand a siege just long enough for the Continental Army to win a victory on ground of his choosing to the north: White Plains, New York.

Washington had a small supply depot there, and the terrain was perfect for a Bunker Hill style battle. The main position was a high ridge with good fields of fire anchored by a swamp on the left. On the right was the strongest position, a steep hill that overlooked the narrow but swift and deep Bronx River, which anchored the right. Any attack would have to cross the river under fire, or advance into the teeth of the main position on the ridge. Washington thought that Howe not risk the river crossing against the formidable hill, and attack the ridge, so he placed militia on the hill (which did an amazing job in the same kind of position at Bunker Hill) and his best troops on the ridge. He was wrong.

After pushing back a skillful delaying action by a Connecticut Regt, Howe saw the hill was occupied by militia, and decided to deliberately attack it. Howe almost lazily arrayed his army (Without know where he was going to attack, Washington could do nothing but watch). Only when Howe brought up his cannon did Washington know that he was going to attack the hill. Washington hastily reinforced it, but the Hessian cannon swept the militia from the crest and the British Army crossed before they could arrive. The rest of the Brits fixed the Continentals on the ridge, while the Hessians under Col Johann Rall (we will see his name again) systematically cleared the hill, unhinging Washington’s line.

The Continental Army retreated north in various states of panic, but a thunderstorm that night and the next day prevented Howe from pursuing. Washington reorganized and crossed the Hudson a few days later, completely abandoning New York except for Fort Washington.

The Kearny Incident

When Germany invaded Denmark in 1940, Britain occupied Iceland, a nominally independent state that Denmark was in union with. As part of FDR’s Lend-Lease Act in early 1941, US Marines occupied Reykjavik in order to free British troops for operations in North Africa.

In the latter half of 1941, the US Navy in the Atlantic was taking an increasingly active role in defending convoys against U-Boats despite no declaration of war between the US and Germany. After the “Greer Incident” in early September (the first time a U Boat fired on a US ship and vice versa) FDR issued a “shoot on sight” order for all German ships in the Atlantic. By October, it was common practice for the US Navy to escort convoys as far as Iceland before turning them over to the Royal Navy.

On 16 October 1941, a German wolfpack attacked a British convoy SC-42 (from Sydney, Canada to Liverpool, England) off of Iceland and overwhelmed the Canadian escorts. After losing nine merchantmen, the convoy commander requested the assistance of the USS Kearny and three other American destroyers docked at Reykjavik. All evening the four destroyers dropped depth charges on the German U-boats, possibly sinking one, and saved the remainder of the convoy.

But the Germans weren’t finished. Just after midnight on the 17th, U-568 fired a spread of torpedoes and one hit the Kearny killing ten sailors and wounding more than twenty. The Kearny managed to control the damage and make it back to Iceland and eventually Boston. The casualties in the Kearney Incident were the first American deaths in the undeclared war against Germany, more than six weeks before Pearl Harbor.

The USS Arizona

On 16 October 1916, BB-39, the USS Arizona, named for the newest state in the Union, was commissioned at Brooklyn Naval Yard in New York City. She was the second and last of the Pennsylvania class “super dreadnoughts”.

Battleship technology was rapidly improving in the decade of the First World War, but the US Navy wanted a “standard type battleship” with similar characteristics to simplify operations. The first class of these super dreadnoughts, the Nevada, set the template for battleships as we think of them today: four turrets split by a central superstructure, moderate speed, oil fueled, long cruising range, extreme gunnery ranges, and an “All or Nothing” armor concept. From 1912-1918, five classes of thirteen ships were constructed and they formed the backbone of the US Navy for twenty years. The Arizona was the second ship of the second class, number four of thirteen.

The biggest flaw of the old ironclads and eventually the Dreadnought class of battleships was the relatively uniform armor across the ship. As the ships got larger, the armor got thinner, but heavier. Something had to give. Battle experience had shown that ships could survive being hit in non-critical areas such as berths, administration, galleys etc, but a hit to the fire control, engine, ammunition, propellant etc greatly degraded if not destroyed the ship. The All or Nothing concept put these essential, and very vulnerable, areas in a central heavily armored “citadel” (the “All”) and minimal armor on everything else (the “nothing”). This saved weight and subsequently increased the armor of the citadel. The compact citadel and turrets had the vast majority of the armor which made the Standard type battleships very survivable. The enemy armor piercing shells that didn’t hit the citadel or turrets flew through the ship’s non battle essential areas usually without exploding. The Nevada class was the first class of battleship to incorporate the All or Nothing concept and the Pennsylvania class improved on it. The concept was confirmed at the recent Battle of Jutland. When the Arizona was launched, her citadel was impervious to the 14” shells of the largest guns in that engagement.

The Arizona and her sisters didn’t see action during the First World War due to an oil crisis, but because of the Washington Naval Treaty of 1922, they were essential to the US foreign policy in the inter war years. The Arizona was the flagship of Battleship Division One and represented American interests in the Mediterranean and Caribbean in the 1920s. In 1928, she was transferred to the Pacific Fleet and became the centerpiece of War Plan Orange, the on-the-shelf US Pacific campaign against a potentially belligerent Japan.

In mid-October 1941, almost exactly 25 years after her commission, the Arizona led the Pacific fleet to sea from its peacetime headquarters at San Diego. Due to a breakdown in the negotiations with an increasingly aggressive and militaristic Japan, the American Pacific Fleet sailed as a show of force to its new anchorage on the big island of Oahu, Hawaii, at Pearl Harbor.

The Battle of Hastings

At the bottom of Senlac Hill, the Norman army advanced in three divisions or “battles”. On the left were the long time Norman allies, the Bretons under Alan the Red. In the center were the Normans, led directly by William and his half-brother Odo, the Bishop of Rouen. And on the right the Flemish barons related to William’s wife Matilda, and the troops of that renegade of the French court Eustace of Boulogne. The battles were formed into three great lines, with archers to the front, followed by the infantry, and cavalry behind.

William began his assault on Senlac Hill at 8am with a rain of arrows, which had little effect on the shield wall proper. However it did kill any levy troops that did not have shields and any horses of the Anglo Saxon nobles who brought them to fight on. Next, William sent in his men at arms, and the battle devolved into a two hour long shield wall press, the kind of fight at which the huscarls excelled. But before the Norman infantry broke, William sent in his knights to support. With no weak point to charge, the Norman knights fought atop their steeds in the line with the men at arms. In places there was the shield wall press, in others, a chaotic melee, and still others, local charges. This panel of the Bayeux Tapestry shows a huscarl beheading a Norman horse with his Viking great ax, a Norman knight skewering a huscarl with his spear, and the shield wall holding firm.

This grinding attritional fight continued for another two hours, until around 3 pm when a rumor spread that Duke William was killed. The Bretons on the left thought all was lost, broke and retreated down the hill. William of course was not dead, and galloped over from the center, and pulled off his helmet to prove so. But the English were pursuing down the hill, which turned into a blessing for the Normans, as the pursuit temporarily broke the shield wall. Odo, the archetypical battle cleric, rallied the Bretons, and wielding his mace (lest he spill Christian blood) led the charge of the reformed left, just as William’s Norman bodyguards charged into the gap created by the pursuit. The English took serious casualties, but many managed to make their way back up the hill. Only Norman exhaustion prevented the complete destruction of the English right.

William by this point was becoming desperate: All Harold had to do was still stand on the hill at nightfall to win while William had to utterly rout the English. With the Breton example, William had what he thought was the template to win the battle: charges and feigned retreats which would hopefully cause the shield wall to unhinge as it did with the Bretons. For the next three hours, a typical pattern emerged: the Norman infantry would charge, then fall back. The Norman knights would charge, but the horses refused to impale themselves on the English spears so both sides just poked at and wailed on each other for a bit, then they too would fall back. Then the archers would fire a few volleys. Rinse and repeat.

The English didn’t fall for the feigned retreat and break ranks, but the sustained losses thinned out the shieldwall considerably. From time immemorial, whether Greek phalanxes, Roman legions, or English shieldwalls, formations of men with shields drift right when they sustain casualties or move, if only to get in the shadow on the man’s shield next to him. And this is what seemed to happen at Hastings: the English battle line shortened due to exhaustion and casualties, and the Norman knights got around the flanks, particularly on the English left. The was almost certainly no “All is lost!” moment for the English. Harold is depicted as shot through the eye on the Bayeux Tapestry, but that’s the only evidence of that happening until accounts of the battle from years later. Contemporary accounts all mention that the English fought on until they were overwhelmed and only broke when it was clear that if they stayed they would be surrounded and massacred. Harold, and his brothers Gyrth and Leofine, all died anonymously on the battlefield.

The bottom line is the English went toe to toe with the Normans for over ten bloody and exhausting hours, and the Normans were simply the last ones standing.

The next day, the Norman cavalry hunted down any survivors. Harold’s body was recovered but his head was so mangled that William sent for Harold’s mistress in London to identify the body. With the majority of the Anglo Saxon nobility dead on Senlac Hill, the Norman victory was complete.

The remaining English contingents from the farther reaches of Harold’s realm that couldn’t reach Hastings in time rallied around the 13 year old Edgar the Aetheling, but William made short work of them. On Christmas Day 1066 in Westminster Abbey, Duke William the Bastard of Normandy was crowned King William the Conqueror of England.

The Battle of Hastings: The Norman Army

When William’s scouts and spies reported Harold was at London, he regathered his army at Hastings, from where he would strike north. William’s army differed significantly from Harold’s. On continental Europe, the most common invaders in recent memory were cavalry based, whether the Huns, Avars, or Magyars from the eastern steppe, or more influentially, the Arabs, Berbers, and Moors from North Africa and Islamic Iberia. Frankish and Anglo-Saxon infantry developed along similar lines until the Franks had no response to the raiding from the Umayyed Caliphate and Charles Martel nearly lost the Battle of Tours in 732 due to a lack of cavalry. The Franks from that point on made heavy cavalry a priority. His grandson Charlemagne’s Paladins, and his heavily armored knights, were a direct result of the need for mounted soldiers.

Warhorses required special breeding, a dedicated support structure, and were expensive to maintain. Only the manor lords and his dedicated henchmen could afford it, and as such the mounted soldier gained a status. Additionally, this also allowed a high degree of training as the riders had no other duties. The difference could be summed up in a common scenario: if a huscarl walked into town, demanded the lord’s taxes, and the village didn’t want to pay, the fight would be relatively even: the huscarl’s training and armor would be offset by the fyrdmens’ numbers. If a knight did the same there would be no question who the victor would be: the knight could ride circles around the shieldwall or fix them in position with a threatened charge while his companions took what they wanted anyway. (They could also demand more from the villages) Feudalism as a result developed more quickly and to a much greater degree on Continental Europe.

This was directly reflected in the composition of William’s 8000 strong army at Hastings: almost evenly split between infantry, cavalry, and archers. The cavalry looked strikingly similar to Harold’s huscarls, albeit on horse, and sans great axe. The infantry were comprised of the men of the cavalry’s support structure: the liverymen, blacksmiths, squires, saddlers, etc just “at arms” hence “men at arms”. They were armed similarly to the fyrdmen but wore mail hauberks and metal caps. Their advantage in armor however was offset by their short martial training, particularly in formation: as artisans they were usually tied to a knight not a unit, and lacked the training time afforded to fyrdmen by the growing season. Which begs the question, “Why didn’t Frankish peasants develop into fyrdmen?” The increased demands of the knights led to better agricultural practices which unfortunately caused more year round work for the peasants. Furthermore, to deal with Muslim raiders, mounted bandits, and robber knights, the peasants became nominally proficient in the common hunter’s bow or shepherd’s sling, their only options to stay out of melee distance, and afforded a small counterbalance against these otherwise unassailable opponents.

Thus, on 14 October, 1066, William the Bastard of Normandy approached Senlac Hill with his army in three great lines. The first were the archers who would rain arrows down on the shield wall, killing or wounding as many as possible. They were followed by the men at arms who would hopefully disrupt Harold’s line enough for the real force of the Norman army: the knights, whose thunderous charge at an Anglo-Saxon weak point would break the shield wall